Простой способ составить график проекта: пошаговое руководство

Хорошо выстроенный график проекта — это расписание вашего проекта: он упорядочивает задачи, ресурсы и сроки так, чтобы работа завершалась вовремя. Когда видны сроки, зависимости и зоны ответственности, команды избегают сбоев при передаче задач и потери темпа.
Сильные графики с самого начала фиксируют главное: даты начала и окончания, вехи, зависимости задач, обновления статуса и ответственных владельцев. Они также разбивают крупные инициативы на управляемые части, делая составление карты зависимостей и планирование ресурсов реалистичными.
В этом пошаговом руководстве вы создадите график, который действительно работает, — используя Xmind для визуализации плана и выравнивания всей команды от старта до сдачи.
Что такое график проекта и почему он важен
График проекта — основа успешного управления проектами. Это подробное расписание, которое определяет последовательность работ, длительность, зависимости и вехи, необходимые для завершения проекта. Он помогает команде сориентироваться в датах начала и окончания, распределении ресурсов и ключевых результатах, ведущих к завершению проекта.
Определение и назначение графика проекта
График проекта — это больше, чем простой временной план. Он служит стратегической дорожной картой, которая разбивает ваш проект на управляемые части. Представьте его как партитуру для оркестра, где каждая нота — задача, а темп задает скорость работы.
Хорошо выстроенный график проекта точно показывает, что нужно сделать, какие ресурсы задействовать и когда проект будет завершен. В графике отражаются такие ключевые элементы:
Все проектные работы с запланированными датами начала и окончания
Назначение ресурсов и распределение работ
Зависимости и связи между задачами
Определенный критический путь и последовательность задач
Вехи, отмечающие значимые достижения
Команда находит путь к конечной цели с помощью графика проекта, который измеряет результаты. Как отметил один эксперт по управлению проектами: «План проекта описывает цели; график проекта определяет средства». График помогает заинтересованным сторонам достигать операционных задач и долгосрочных стратегических целей, хотя сам по себе не имеет внутренней ценности.
Преимущества четкого графика проекта
Хорошо выстроенный график проекта дает много преимуществ, напрямую влияющих на успех проекта. Команда выстраивается вокруг понятных приоритетов и сроков, и каждый понимает свою роль в успехе проекта.
Тщательно продуманный график проекта помогает предотвращать задержки, заранее выявляя возможные узкие места до того, как они повлияют на даты сдачи. Такой проактивный подход к управлению графиком помогает сопоставить возможности команды с потребностями проекта. Вы можете заранее заметить и избежать конфликтов в расписании и ограничений по ресурсам.
Графики проекта — отличный способ видеть прогресс и блокеры. Распределенным командам нужен «единый источник истины» о статусе проекта. Такая прозрачность помогает быстрее и увереннее принимать решения на протяжении всего жизненного цикла проекта.
Самое важное преимущество дает эффективное планирование, которое снижает риски и повышает предсказуемость поставки. Совместное отслеживание ресурсов и сроков ведет к более обоснованным решениям о расширении команды, распределении ресурсов и оптимизации рабочего процесса. Ваш график становится ранней системой предупреждения как о недоиспользовании, так и о рисках выгорания.
Пошагово: как создать график проекта с Xmind
Для эффективной работы графику проекта нужны структура и визуальное мышление. Xmind помогает превратить сложное планирование проекта в понятный и управляемый процесс. Посмотрим, как шаг за шагом создать график проекта с этим инструментом.
1. Определите объем проекта и цели
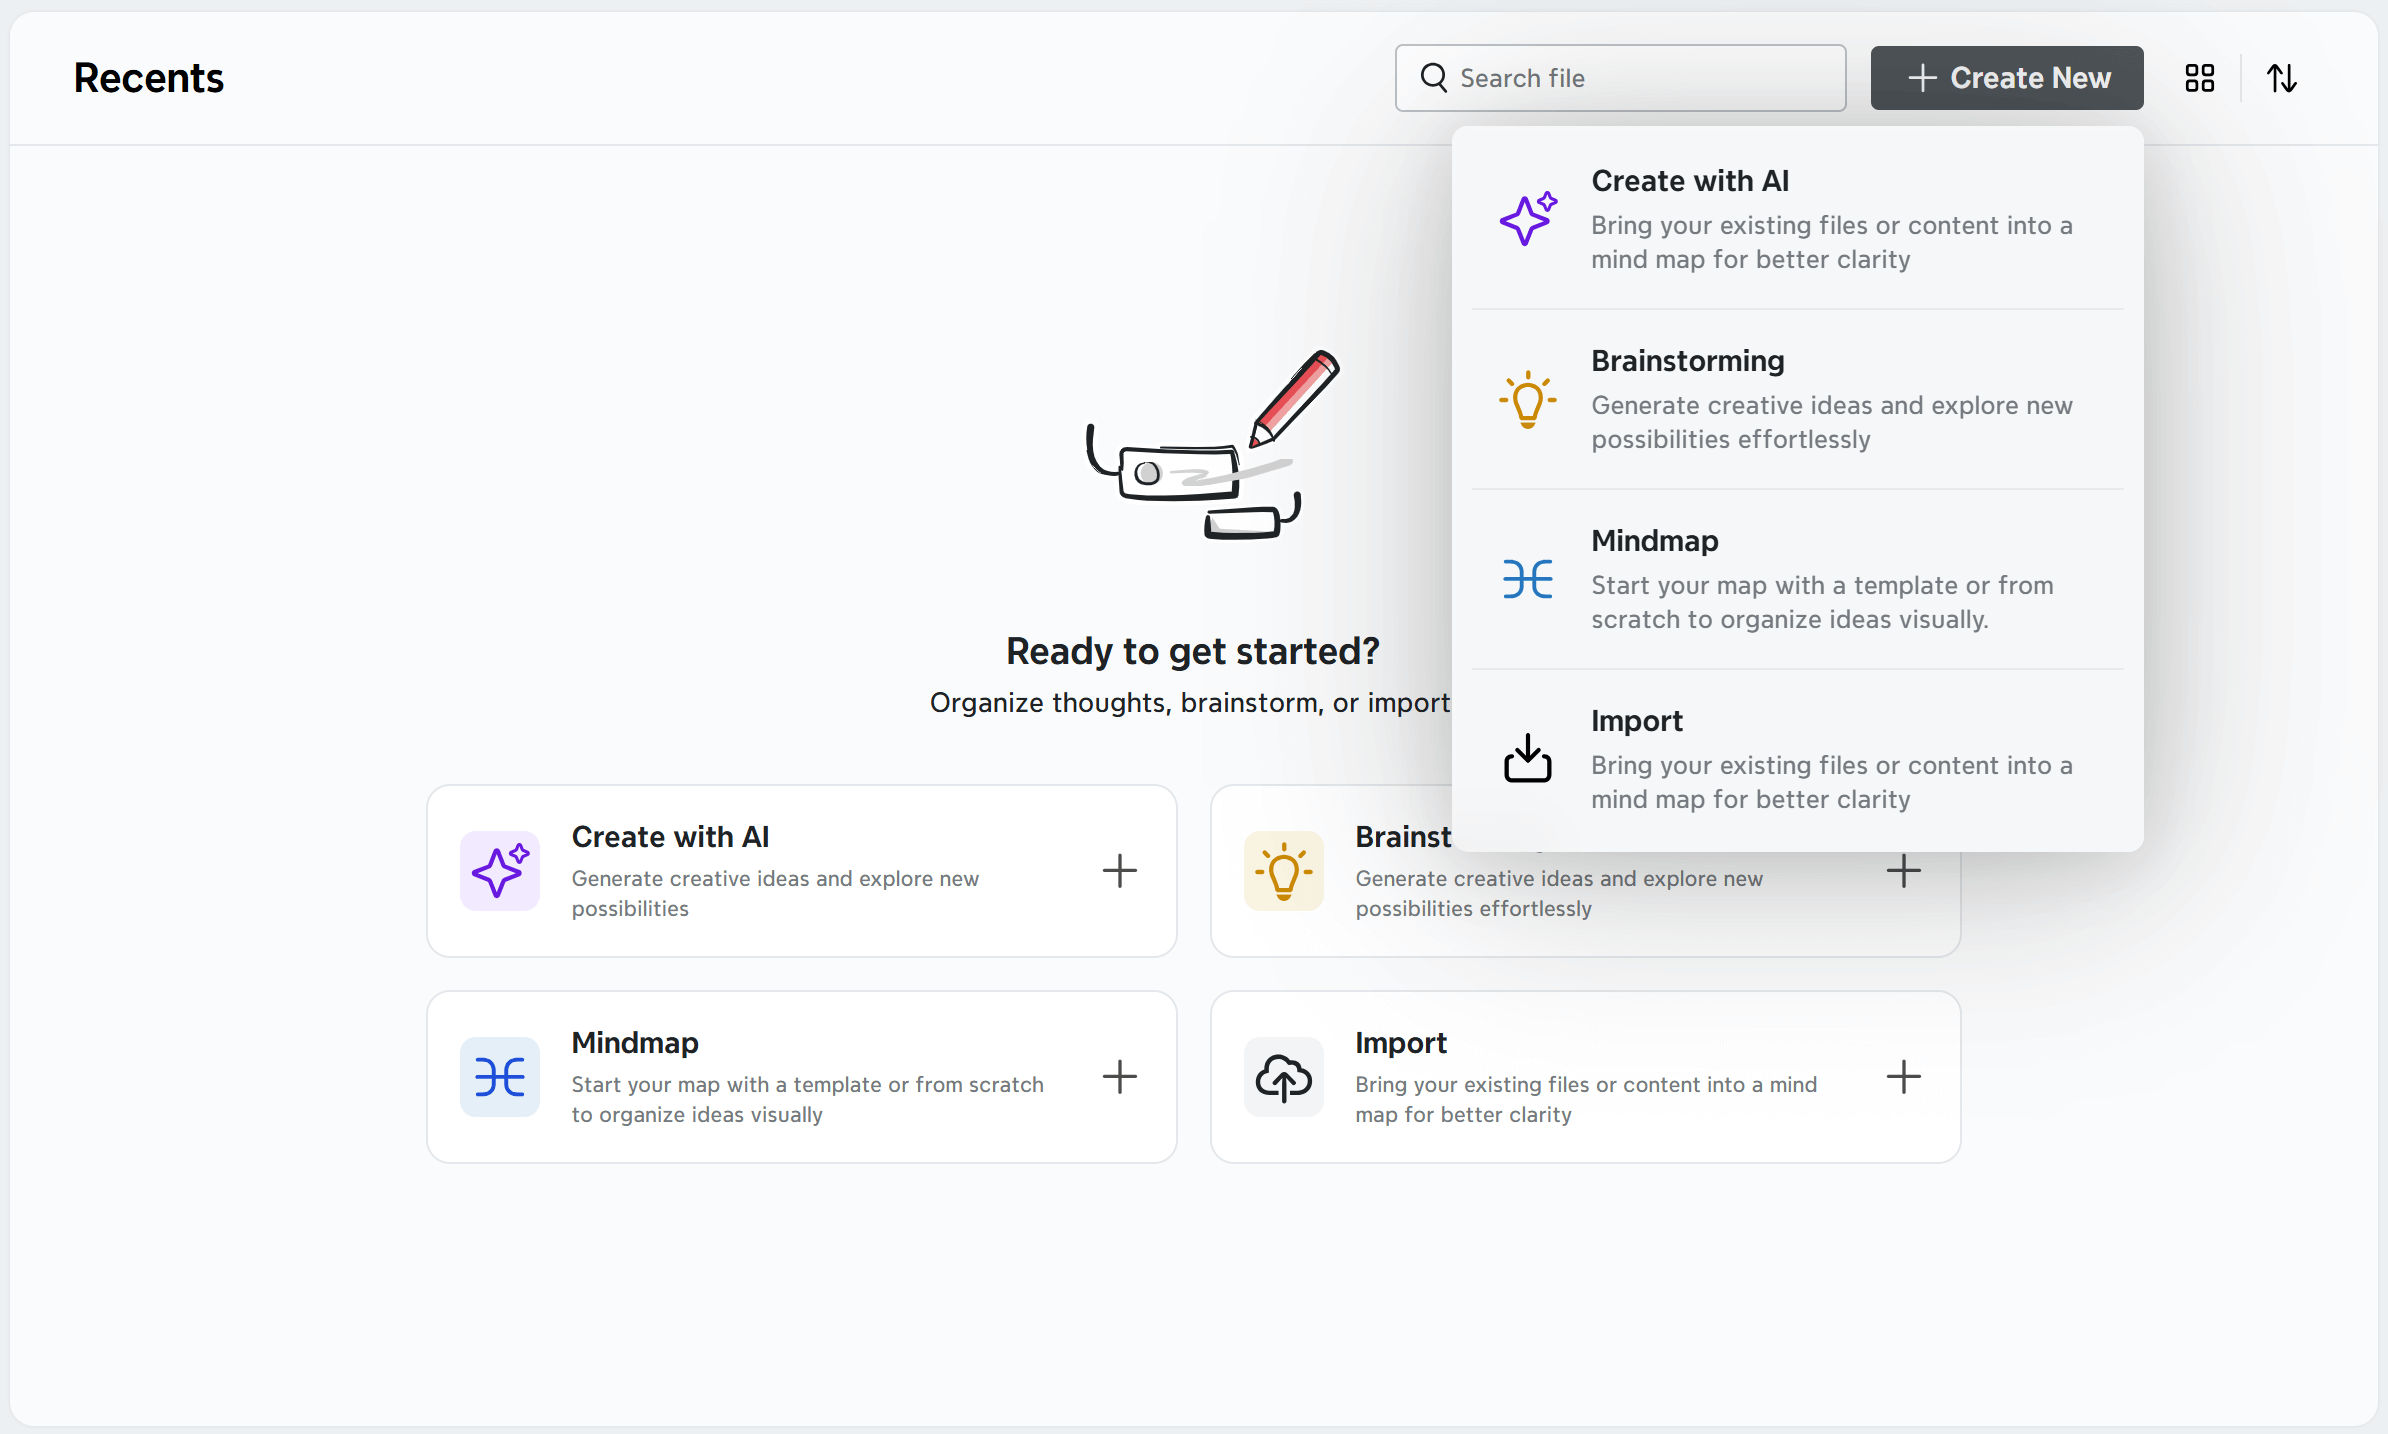
Начните с пустой карты и поместите в центр основную цель проекта. Структуру можно запустить двумя способами:
Create with AI: введите короткий запрос (например, «Website redesign project»), и Xmind создаст начальную карту с целями, вехами и результатами, которую можно сразу редактировать на холсте. Это самый быстрый способ перейти от идеи к рабочему плану.
Brainstorming Hub: откройте Brainstorming, выберите режим и исследуйте направления; когда будете готовы, нажмите Organize, чтобы превратить идеи в чистую, структурированную интеллект-карту. Это идеально, если у вас есть лишь фрагменты объема и их нужно логично упорядочить.
Уточняйте объем по критериям SMART (конкретные, измеримые, достижимые, релевантные, ограниченные по времени). Если ветке нужен другой вид (например, логическая схема для допущений), переключите ее макет через Format → Style → Structure, чтобы структура соответствовала задаче.
2. Разбейте задачи на четкую WBS
Разбейте проект на результаты → промежуточные результаты → рабочие пакеты. Постройте каркас как интеллект-карту, а затем углубляйте каждую ветвь, пока каждому листу можно будет назначить исполнителя и отслеживать его.
AI-assisted breakdown (0→1): используйте ИИ Xmind, чтобы за секунды превратить краткое описание в иерархическую карту; для сложной работы включите более глубокое мышление, чтобы умно расширять ветви. Вместо пустой страницы вы получаете готовый к доработке план.
Два взаимодополняющих представления: сохраняйте визуальную иерархию в Mind Map/Tree Chart для обсуждений WBS, а затем переключайтесь на Tree Table, когда нужен список владельцев, длительностей или трудозатрат. Одна и та же карта, разные ракурсы.
Сделайте структуру читаемой: обводите связанные группы с помощью Boundary (добавьте короткую метку) и используйте Markers, чтобы с первого взгляда передавать приоритет или статус. Эти визуальные подсказки делают крупные ветви WBS удобными для быстрого просмотра.
3. Превратите декомпозицию в таблицу графика
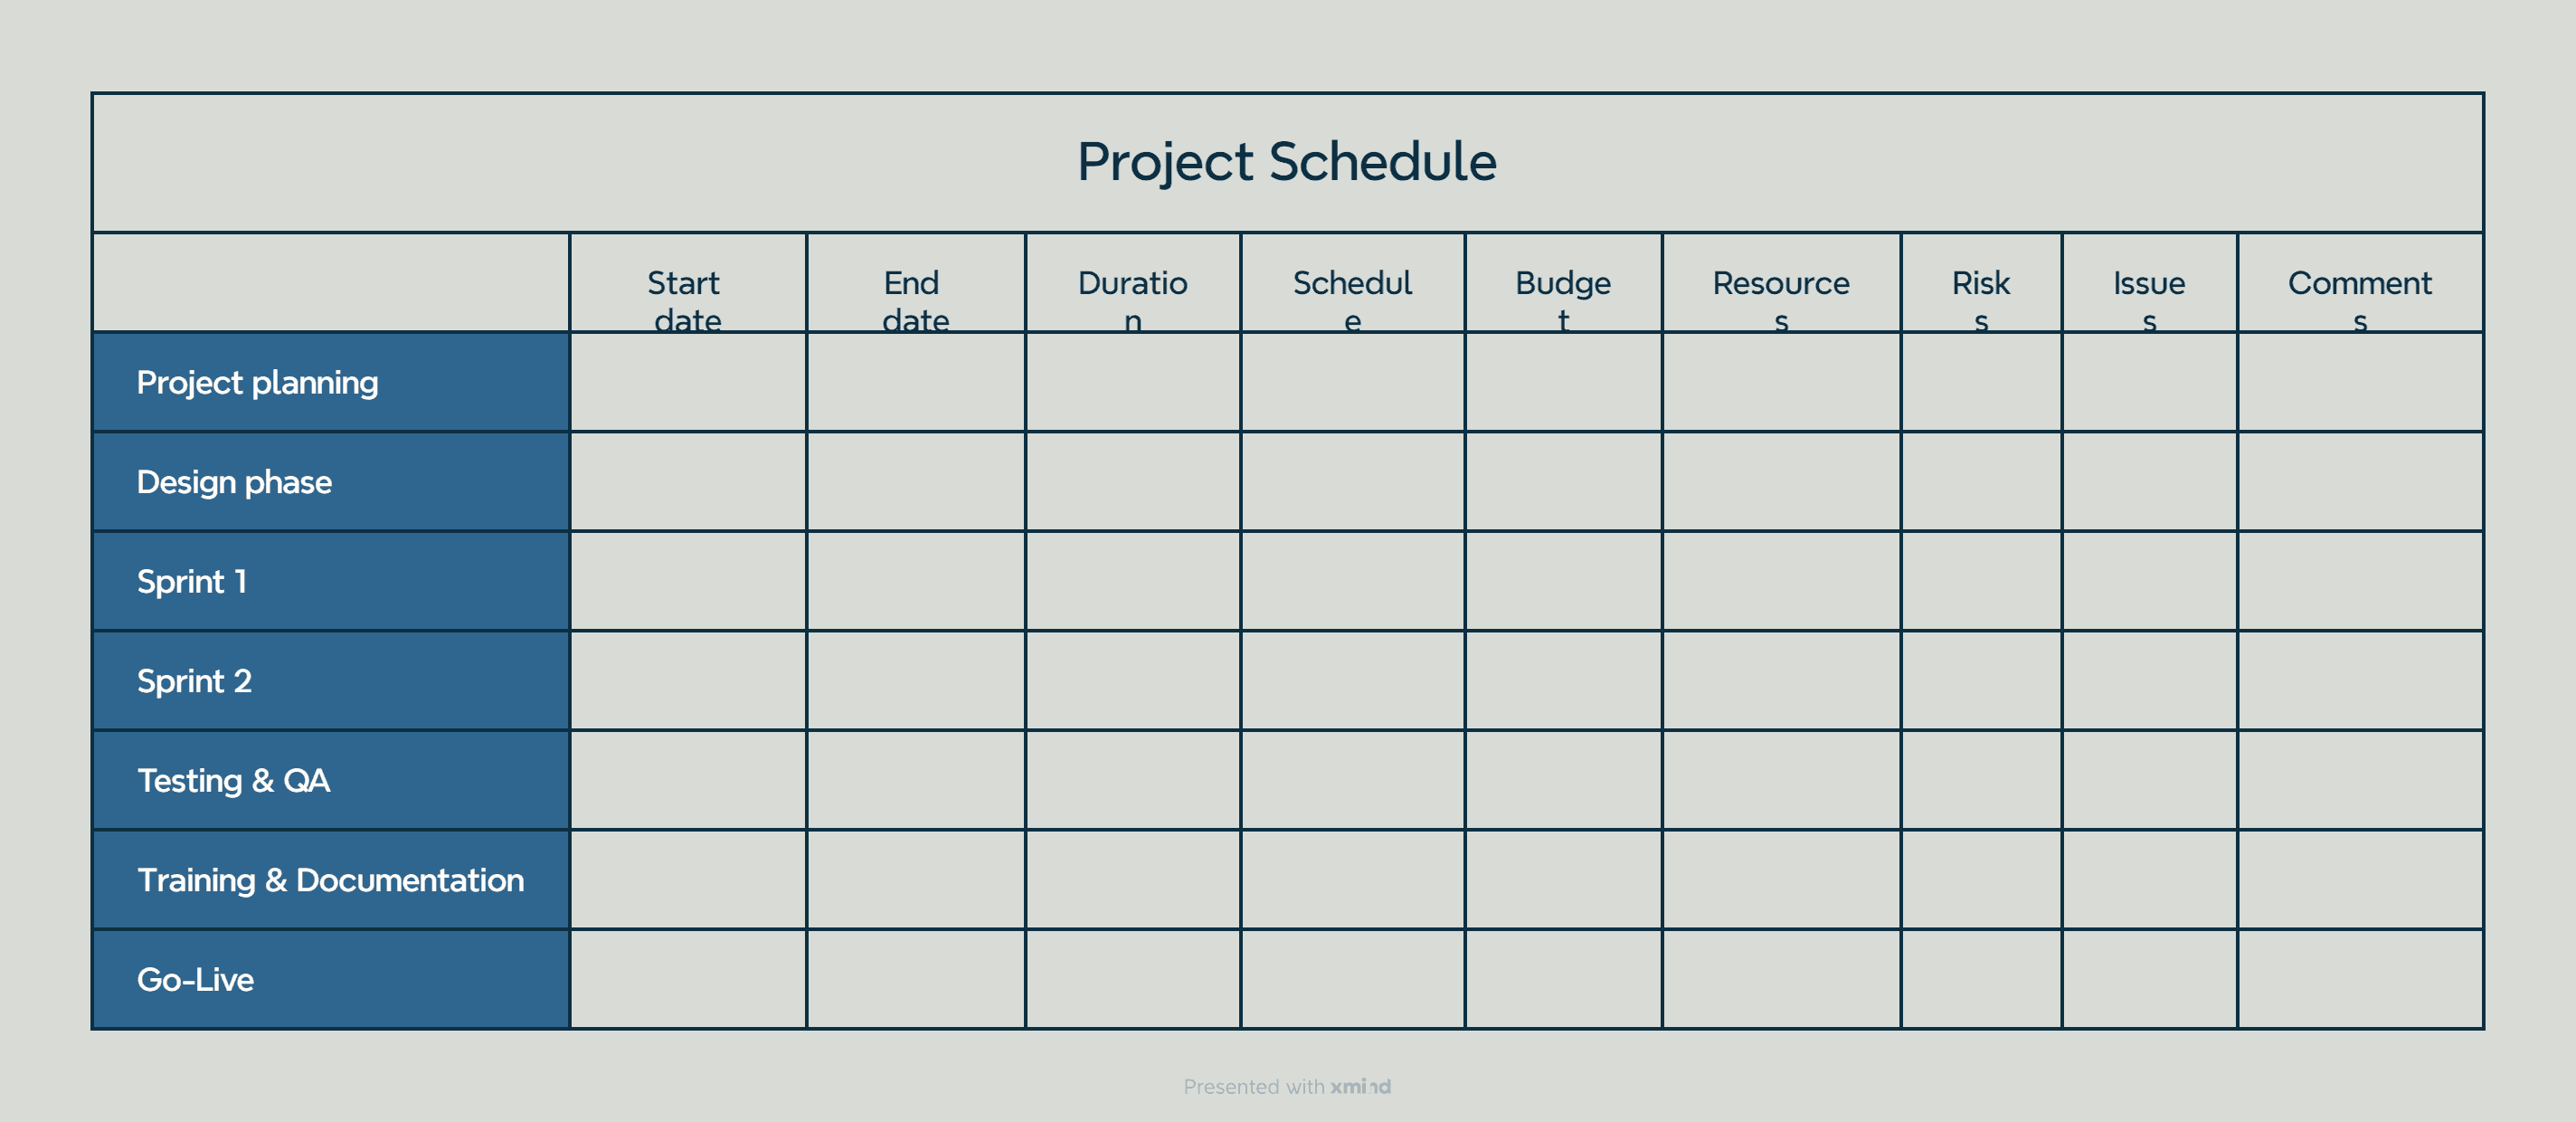
Воссоздайте «Project Schedule Template Example» как живую таблицу прямо в Xmind.
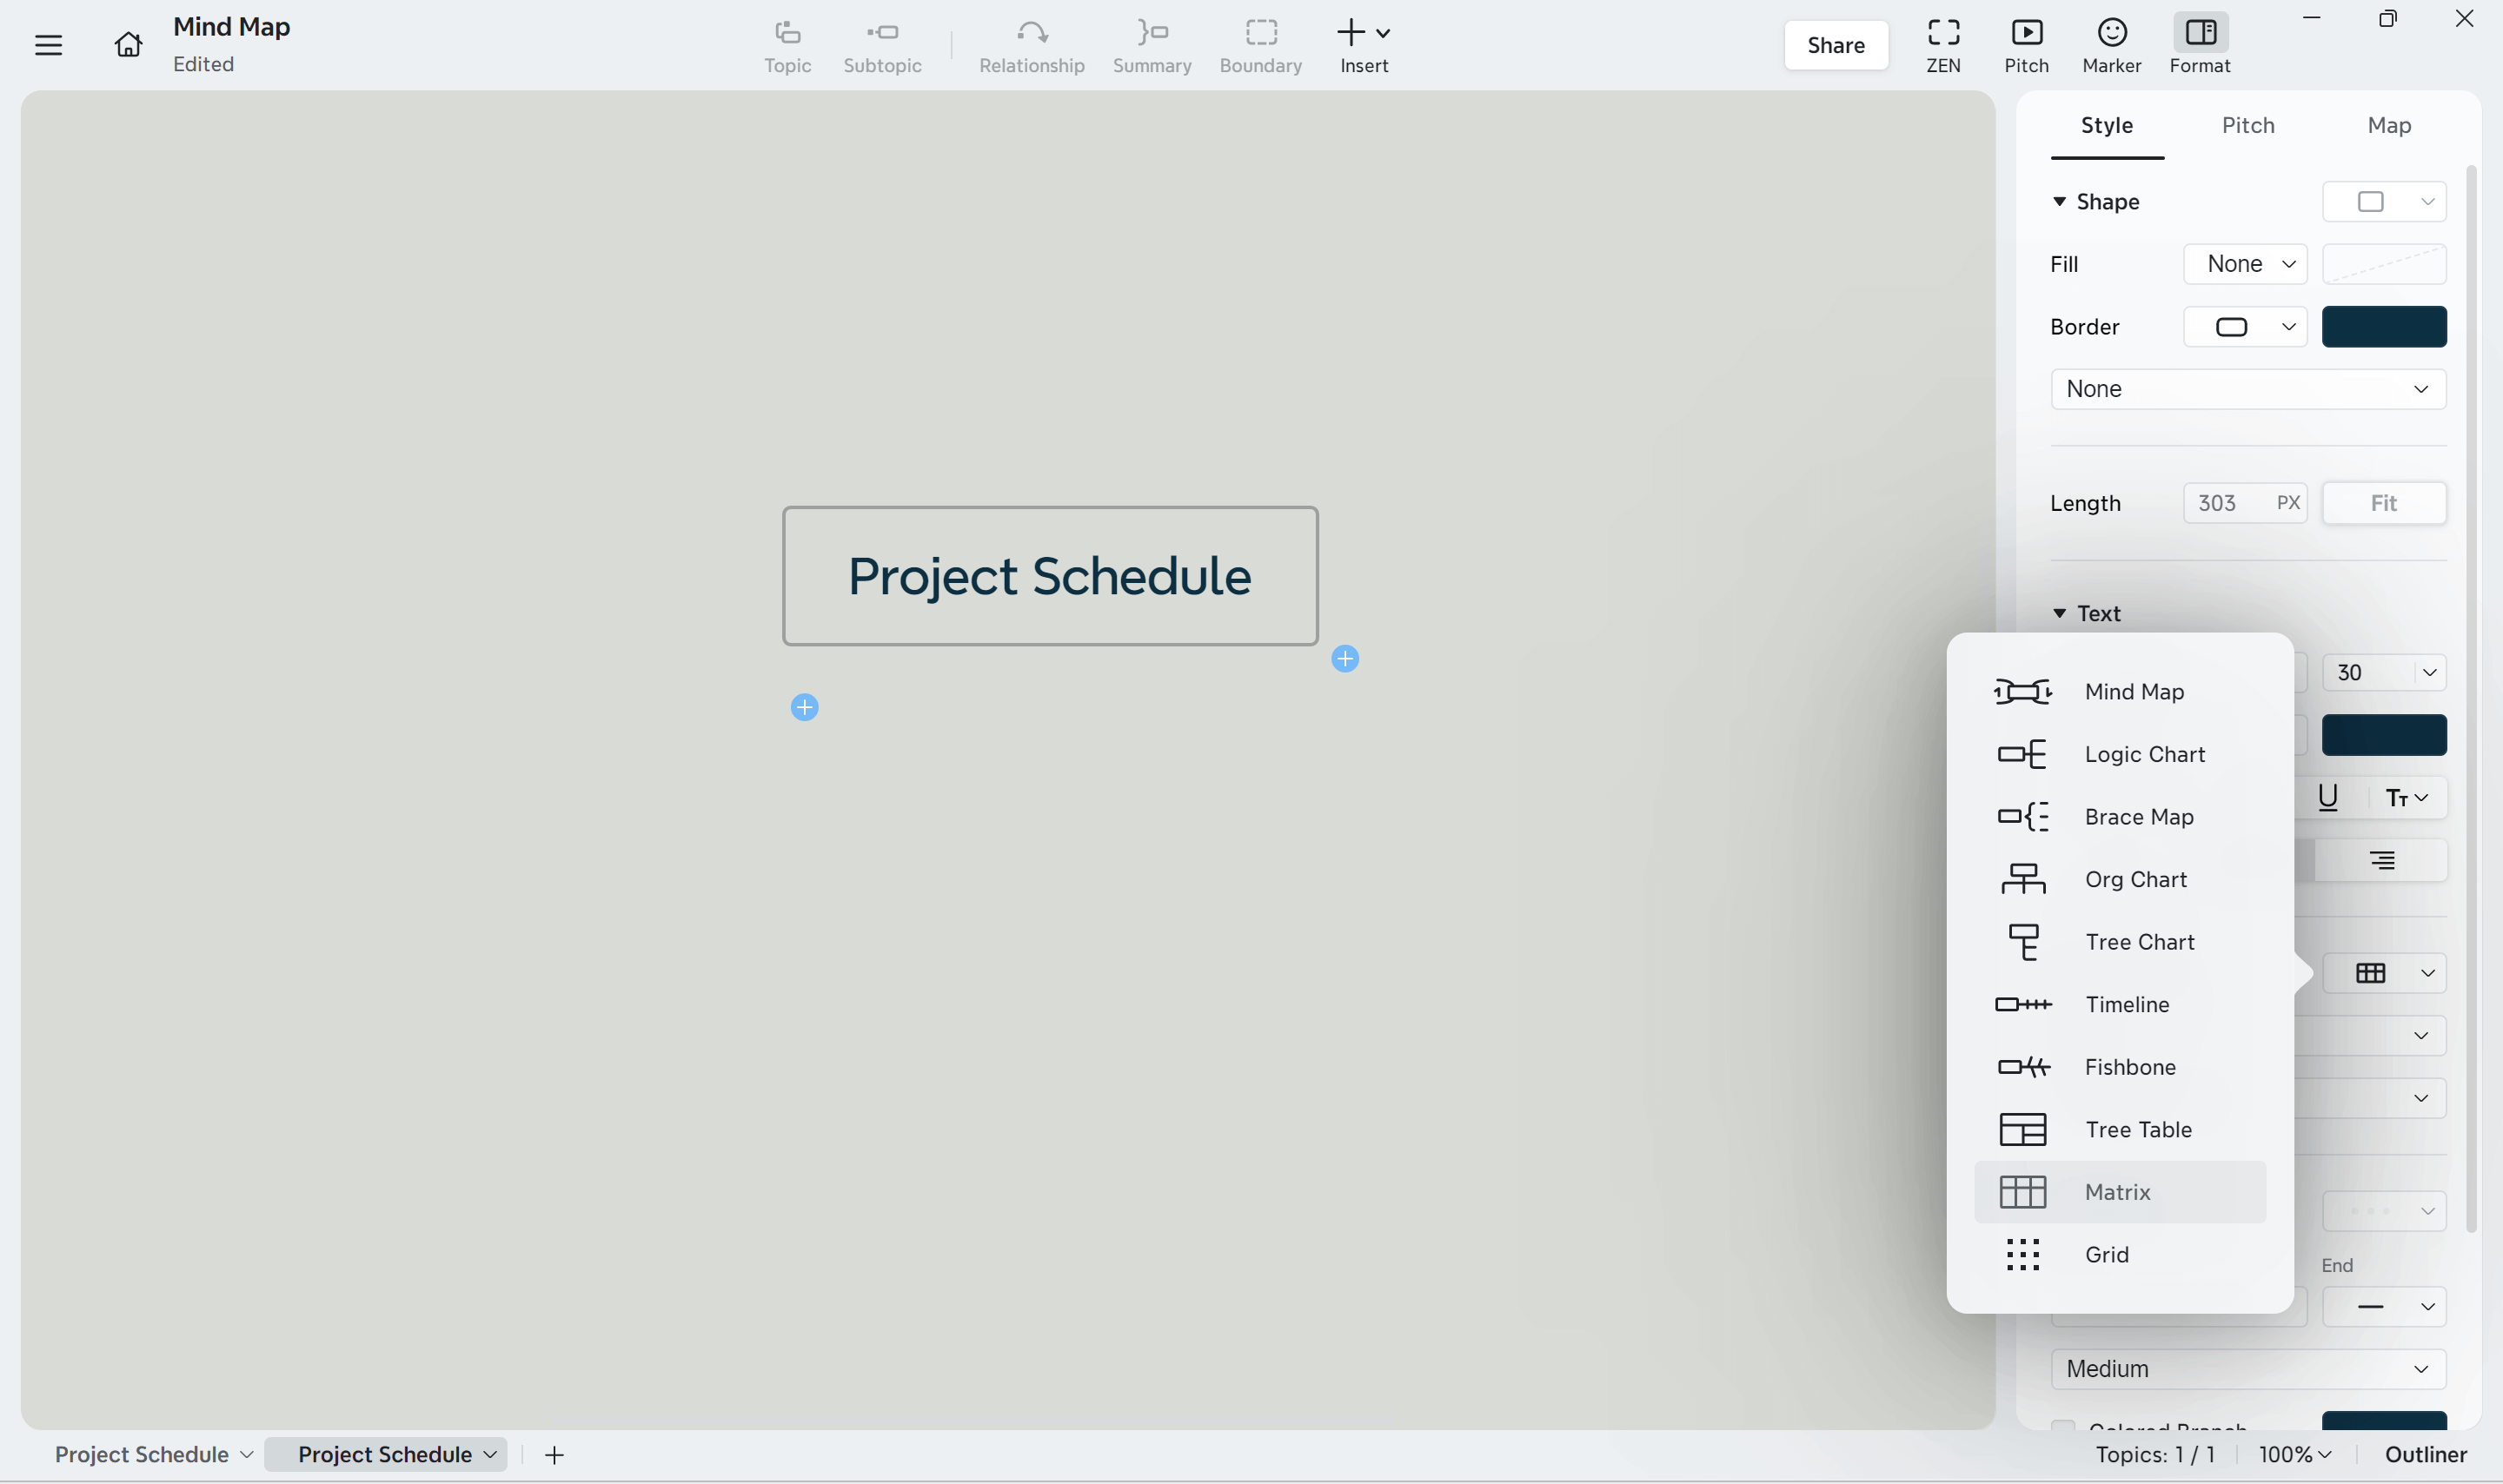
Переключитесь в Matrix
Выберите узел, в котором будет размещена таблица (например, «Project Schedule»).
Перейдите в Format → Style → Structure → Matrix, чтобы преобразовать этот узел в сетку.
Добавьте столбцы (заголовки)
Создайте первую строку как заголовки и назовите ячейки так же, как в вашей таблице:
Чтобы добавить новый столбец, используйте ручку + на холсте рядом с центральной темой (или добавьте тему в эту строку заголовков).
Добавьте строки (по одной на этап)
Нажмите Enter в ячейке, чтобы вставить еще одну строку под ней (самый быстрый способ); или используйте Insert → Topic.
Заполните каждую строку данными по этапу (например, Design Phase, даты, длительность, статус вроде On Track / Slightly Behind, бюджетные показатели, назначенные роли, заметки о рисках/проблемах и комментарии).
Сделайте таблицу читаемой
Используйте Style, чтобы выровнять текст и настроить фон ячеек по статусу (зеленый для On Track, красный для Behind).
Держите риски и проблемы кратко в ячейке; подробности раскрывайте в Notes, привязанных к теме этой ячейки.
Этот Matrix становится вашей единой, удобной для быстрого просмотра таблицей — почти как электронная таблица, которую вы показывали, но связанной с той же картой и WBS.
4. Оцените длительность и назначьте ресурсы
Для каждого рабочего пакета/этапа оцените трудозатраты и длительность с учетом сложности, доступных навыков, исторических данных и резервов на риски. Затем сделайте элементы отслеживаемыми:
Добавьте к теме Planned Task (верхний + → Planned Task или щелкните правой кнопкой → Task), задайте Priority, даты Start/Due и обновляйте Progress (0–100%) по мере выполнения работы.
Используйте markers, чтобы отмечать срочность или статус для быстрого просмотра на карте и в Tree Table. (Xmind фиксирует выполнение в процентах.)
5. Задайте вехи и дедлайны, затем регулярно пересматривайте
Превратите ключевые результаты в milestones и выстройте вокруг них регулярный цикл проверки:
До и после каждой вехи сравнивайте фактические показатели с планом и обновляйте Progress (%) у связанных задач.
Фиксируйте решения и контекст в Notes; оставляйте обратную связь в Comments, чтобы обсуждения оставались рядом с работой.
Если приоритеты меняются, перетаскивайте ветви, пересматривайте даты и — при необходимости — переключайтесь на Tree Table для табличной проверки, а затем обратно на Timeline для фокуса на датах.
Хотите создать свой первый график проекта? Попробуйте Xmind сегодня и посмотрите, как визуальное планирование проекта может улучшить ваш рабочий процесс.
Практические советы по упрощению планирования проекта
Планирование проекта может быть простым и понятным. Упрощенный подход часто приводит к лучшим результатам. Вот несколько практических советов, которые помогут сделать планирование проще и эффективнее.
Умные советы по планированию: от выбора планировщика проекта до формата графика
Сначала объем, потом время. Сначала зафиксируйте границы (что входит и что не входит), а уже потом ставьте даты. Четкий объем не позволит планировать лишнюю работу.
Выбирайте формат, который помогает принять решение. Используйте Gantt, когда важны зависимости и критический путь, calendar/timeline, когда на первом месте даты и события, и простой task list для короткой работы с одним владельцем.
Применяйте правило 8/80 разумно. Разбивайте задачи так, чтобы каждая занимала 8–80 часов. Меньше — это накладные расходы; больше — скрывает риски и делает оценку неточной.
Стройте план с учетом реальных ограничений. Заранее добавьте в рабочий календарь отпуска, праздники, периоды блокировки и сроки поставщиков — это дешевле, чем переделывать позже.
Сначала выстраивайте последовательность, потом оптимизируйте. Сначала разметьте зависимости (FS/SS/FF/SF), затем выровняйте ресурсы. Не сжимайте график, пока поток работ не выстроен правильно.
Рано зафиксируйте базовый план и часто к нему возвращайтесь. Установите baseline графика и проверяйте его на каждой вехе; корректируйте оценки, владельцев и резервы по мере изменения реальности.
Сделайте статус удобным для быстрого просмотра. Используйте единые цвета или метки для этапов, зон риска и просроченных задач, чтобы заинтересованные стороны могли прочитать план за секунды.
Рекомендуемое программное обеспечение для планирования проекта
Xmind — лучше всего для визуальной наглядности и быстрого планирования
Microsoft Project
Jira Software
Smartsheet
Monday.com
Заключение
Планирование проекта — это основа эффективного управления проектами. Хорошо выстроенный график превращает сложную работу в упорядоченные задачи с понятными сроками и ресурсами, давая командам направление, а заинтересованным сторонам — прозрачность.
Сильные графики начинаются с четкого объема и продуманной декомпозиции работ. Разметьте зависимости, оцените длительность и представьте план в виде визуальной временной шкалы — затем поддерживайте его актуальность регулярными проверками и корректировками.
Если все сделано правильно, планирование не просто помогает уложиться в сроки: оно предотвращает узкие места, оптимизирует ресурсы и заранее выявляет риски. Используйте Xmind, чтобы визуально строить и поддерживать свой график и держать всю команду в одном ритме от старта до сдачи.
FAQs
Q1. Каковы ключевые компоненты эффективного графика проекта?
Эффективный график проекта включает четкую декомпозицию задач, оценку длительности, назначение ресурсов, зависимости между задачами, вехи и дедлайны. Он служит дорожной картой, которая ведет команду к завершению проекта, обеспечивая при этом контроль прогресса и управление ресурсами.
Q2. Как упростить процесс создания графика проекта?
Чтобы упростить планирование проекта, начните с четкого определения целей, разбейте задачи на управляемые части и используйте визуальные инструменты, такие как диаграммы Ганта или временные шкалы. Рассмотрите использование ПО для планирования проекта с настраиваемыми шаблонами и не забудьте учесть доступность команды и возможные риски.
Q3. В чем преимущества использования ПО для планирования проекта?
ПО для планирования проекта помогает ускорить процесс планирования, улучшает взаимодействие и повышает прозрачность хода проекта. Оно часто интегрируется с другими инструментами управления проектами, позволяя получать обновления в реальном времени, проще распределять ресурсы и эффективнее отслеживать дедлайны и вехи.
Q4. Как часто следует пересматривать и обновлять график проекта?
Регулярный пересмотр и обновление графика проекта крайне важны. Рекомендуется часто отслеживать прогресс и вносить изменения по мере необходимости, особенно после достижения ключевых вех или при неожиданных изменениях. Это помогает поддерживать актуальность и точность графика на протяжении всего жизненного цикла проекта.
Q5. Как лучше всего сообщать о графике проекта заинтересованным сторонам?
Самый эффективный способ сообщать о графике проекта — использовать визуальные представления, такие как диаграммы Ганта или временные шкалы. Они дают четкий обзор задач, дедлайнов и прогресса. Регулярные обновления и выделение ключевых вех помогают держать заинтересованные стороны в курсе и синхронизировать их с ходом и целями проекта.


